

Showing posts with label kids crafts. Show all posts
Showing posts with label kids crafts. Show all posts
Wednesday, June 18, 2014
Teachers Appreciation Gifts: Hand Print Pillows
Tuesday, February 25, 2014
Turn your Kids Art into Greeting Cards
I keep pretty much every piece of 'art' my little ones make. I was
spring cleaning a little and going through all the kids art work trying
to keep the most special pieces - as even by age 4 my drawers are
overflowing with precious scribbles and blobs of paint.
I couldn't bring myself to throw away any of the art and this project has been in the back of my mind for a long long time.
This is an example of the sorts of pieces I have.

I couldn't bring myself to throw away any of the art and this project has been in the back of my mind for a long long time.
This is an example of the sorts of pieces I have.
Monday, February 17, 2014
WIP: Kids Art Quilt: Fabric Building Blocks
My scrap bag has got utterly out of control - over flowing onto the floor and carpet - so I spent the weekend organizing scraps into colored bins and discovering little bits here. Separating pieces that I can turn into speedy negative space filled quilts. I feel like since Freddie arrived I have become a little bit possessed and obsessed in thinking about quilts I can quickly make so that I can load and spend the majority of time quilting them. The more negative space the better!

Tuesday, October 15, 2013
Two-tone Playsiks

Our coffee filter butterfly tree has gotten many a compliment (we sadly just took it down to make our Halloween tree.) If you remember we made many of our beautiful butterflies by simply dipping and hanging our coffee filters in liquid watercolors. I know I must seem mildly obsessed by dying silks but it did make me wonder if we could make play silks this way. Just dip the silk in two pots and let it sit there and soak up the colors.

In each container is filled with approx 16oz of hot water, 6oz of vinegar & a good squirt or more of food coloring. You can read more about dying play silks with kid friendly dyes here, here & here.

We left the silks to soak for 30mins or so.


The results were really quite pretty - I gave into the imperfections in the color and enjoyed the design that the process resulted in.


They also make really pretty neck scarfs.
Other dyeing fun we have had:
Tissue Dyed Silk Pillows
Two Tone Play Silks
Teacher Appreciation Gift: Home Made Play Silks
Easy Silk Scarf Dyeing with Tissue Paper
Kid Friendly Dyeing - Making your own Play Silks
Monday, June 10, 2013
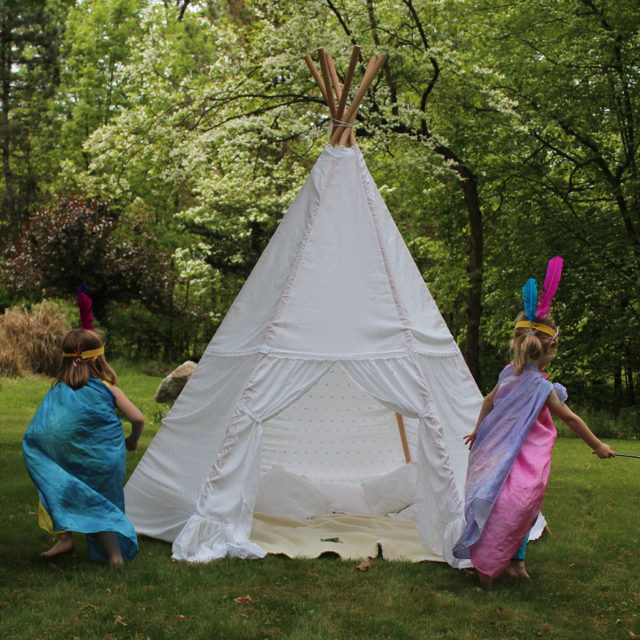
Recycled Teepee Play
I took our recycled teepee to the country along with our playsilks. Let the play begin!


Giggling away inside.

Dancing around the teepee.


Inspecting the local wildlife.

I made the headbands by pushing some colored feathers through a band of felt. The felt was secured together by a ribbon tie.

After the initial excitement the girls decided to decorate the teepee with flowers - inserting them into the cotton eyelet holes.


Giggling away inside.

Dancing around the teepee.

Inspecting the local wildlife.

I made the headbands by pushing some colored feathers through a band of felt. The felt was secured together by a ribbon tie.

After the initial excitement the girls decided to decorate the teepee with flowers - inserting them into the cotton eyelet holes.

I hope you had a sunny time outside this weekend too.

Thursday, June 6, 2013
Teacher Appreciation Gift: Hand Print Pillows
For my eldest bunny - we made her class teacher & classroom assistant hand print cushions.

You may remember that I made these before for Grandma on Mother's Day.

Each child in the class made his or her hand print using fabric paint.
I quilted the front of each cushion (experimenting with free motioning quilting - one continuous line in a heart pattern - not perfect ...


... way harder than it looks) and added some embellishments (felt flower pot & a bow.)

I wanted the pillows to be very fun and happy so this time I made a ruffle trim. (I have a new ruffler foot - which I would much recommend for endless hours of fun easy ruffles.)


I made labels for the back of the cushions so the teacher can identify who made each hand print. I favor a pillowcase closure for cushions - easy and prettier than a messy zipper (I am scared of zips!)

I hope you all have a wonderful summer holiday. I can't wait not to have to load all the kids in the car (twice) every morning for the school run and if you are wondering what to do with your little people this summer check out Fun at Home with Kids, Growing a Jeweled Rose and the Artful Parent for endless ideas for fun and inventive play.
Tuesday, June 4, 2013
Teacher Appreciation Gift: Home Made Play Silks
My girls go to a really sweet preschool. Next year they will be
moving schools - so I wanted to thank their teachers for giving them
such a lovely and happy experience. I asked their movement and music
teacher if there was anything she would like for her classroom and what
do you know - she wanted some colored silks for the movement classes!
We decided 30" square silks would be the best size as her classes range from just under 2's to 4+.
Again I used food colors to ensure the silks were super kid friendly. I used the McCormick Assorted Food & Egg Dye and the McCormick Neon Food & Egg Dyes.

I have posted a previous post about kid friendly dyeing techniques here. But to recap -
- Soak silk in hot tap water with a glug of vinegar while you make your mixture. (I'm in a debate about whether soaking the silks before hand is really necessary - if I do this again I will try using dry silks.)
- Mixture: 1/2 bottle of 0.25oz food coloring with 16 ounces of hot tap water + 6 ounces of vinegar.
- Squeeze water out of silk and place silk in a pyrex bowl with the dye mixture.
- Leave it there and stir occasionally - you will see when the dye has been absorbed as the liquid will become a lot clearer - approx 20 mins - although we did leave ours hanging around most of the afternoon.

- Rinse in cold wash & dry on hottest cycle in tumble dryer.
Amazingly bright colors. My only disappointment was that the neon 'pink' and the assorted 'red' are practically the same hue.
TIP: If your silk ends up looking like this first try (I rushed it) do not panic - just make another mixture of dye, water & vinegar and resoak the silk.


You can see how bright the green came out (far left) on the second soak.
Tuesday, May 21, 2013
Recycled Teepee
When a friend of mine pointed me towards this tutorial on A Beautiful Mess about how to make your own teepee - I jumped at the opportunity to whip one up. I was amazed how quickly this project came together - but also the size of it - it is much bigger than I had thought it would be!

Before we moved into our house the previous owners had lived here for 45 years. I don't know if they had the same curtains for that period of time - but we took every curtain down. I washed kept some white 'cotton' eyelet curtains for a potential craft project. This material has now been sitting in a box for 3 years - hurrah - a purpose and confirmation of my belief that one should never throw material away.

I had to amend the tutorial slightly (my teepee is slightly narrower by 2" at the base) as I had a limited amount of material to work with.
Some of the material was damaged - but I just had to embrace the frays and nicks in some places.

I constructed the front panel differently from the tutorial. The front panel is a triangle at the top and then two gentle ruffled curtains with more abundant ruffles at the base of each curtain. I had some fabric scraps left over from the project and not enough length in the curtains so I sewed all the left overs scraps together and ruffled them - I think the ruffles hide all the seams well.

I carefully trimmed and saved some of the scalloped edges to make the curtain tie backs.

Inside the teepee I sewed 3 ties to each seam. One at the top, in the middle and at the bottom. I used ribbon that was left over from our Princess Tea Party - but I think you could use anything that can be tied tightly without ripping.
Instead of using 2x1 lengths of wood - I opted for a pricier round 1 3/8" wood molding poles (8ft lengths). Personally I think they were worth the extra cost.

The teepee will be mostly used outside but I did put felt pads on the bottom of each pole. Despite sanding the base of each pole before hand - I was worried that the poles would scratch or mark the floors when we played with it inside.
I made a mat for the tee pee out of an old wool blanket I purchased on ebay for $18.26 (that price includes the shipping.) Ebay is an excellent source for finding recyclable materials. Once I had reminded myself of the basic geometry of a perfect triangle I began cutting and constructing my hexagon blanket. I even reused the binding of the original blanket on the edges. I might decorate this blanket in a cute way at a later date.

I hope this will inspire you with your own tee pee! The Land of Nod & Magic Cabin have lovely teepee's for sale. And if you would like to make a smaller scale teepee here is the cutest little teepee on LoLovie her teepee is made from a tutorial on Pink Toes and Power Tools.
Monday, May 6, 2013
Cherry Blossom Tulle Pom Poms

We had a birthday party at the weekend so I made some tulle pom poms as a gift. They also reminded me of our cherry blossom tree outside they were so pink and full. I used 3 different colors of pink in the pom poms. They are so quick and easy to make - you can find the tutorial here.

I hope you had a fun and sunny weekend too.
Wednesday, April 17, 2013
Paper Roll Craft: Super Hero Bracelets


I thought that this would be an easy craft to make out of toilet rolls - however I under estimated the complications of what happens to the consistency of a toilet roll when a small child applies copious amounts of wet paint. Here is what we learnt.


We cut out toilet rolls once down the back and then in half. We then stuck the join together again with blue painters tape on the inside and stuffed the tube with old newspaper.

This may seem like a strange way of doing things - to cut and then stick back together etc - but we went through a couple of versions of this before the toilet roll pieces survived - when you paint the toilet roll it tends to collapse go floppy. This was the best process we came up with.
- paint (allow to dry)
- apply a light layer of glue and then roll in glitter (allow to dry)
- seal on the glitter by applying a layer of gluey glaze (1 part glue to 2 parts water) (allow to dry)
- add some super hero gems/sparkles
Once all your paint, glitter and glue is dry remove the newspaper and painters tape from inside and round of the corners.

Your little one will now be ready to go and fight some super villains.


What would your super hero power be?
Subscribe to:
Posts (Atom)