
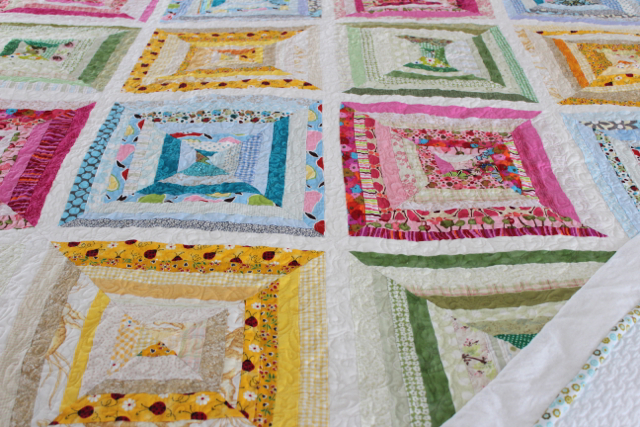
This is another beautiful quilt made by Andrea. Andrea claims no originality in this quilt - but having not seen the fabric or pattern before - I think it is just gorgeous. (I understand the pattern is from the book Shots & Stripes.)


 ... it all looked a little odd when I laid everything together so I made one of these long strips into this little baby mat/quilt (still to be quilted.)
 It has cute scrappy corners.
 ... I haven't quite decided on exactly how it is all going to come together ... but I have a vague vision at least ... somewhere over the top of that never ending laundry basket!!
 I beginning to like mixing up bright colors for these smocks - the color splashes seem adapt for little budding artists. I'm often much to shy with color - something I'm really trying to get better with.
 Step 2: Starting at the top of the border/strip stack your pieces into a pile. Be careful to stack them in order!
 Step 3: Take the first two squares from the stack. Place them right sides together and sew a seam on the right hand edge. DO NOT REMOVE THE SEWN SQUARES FROM THE MACHINE. Then take the next two squares from the stack, place them right sides together and feed them into the machine following your first two squares.
  Continue this process until you have reached the end of your stack.
 Sew squares together in a chain

 Cut threads between the pairs of squares
 ... and take the first two pairs right sides together and sew a seam on the right hand edge. DO NOT REMOVE THE SEWN SQUARES FROM THE MACHINE. Then take the next two pairs from the stack, place them right sides together and feed them into the machine following your first two squares. Continue this process until you have reached the end of your stack.
 Sew pairs together in a chain
 Continue to sew chains of squares together
 Step 2: Starting at the top of each row stack your pieces into piles. Be careful to stack them in order.
 Step 3: Take the first two squares from the top of stacks Row1 and Row2. Place them right sides together and sew a seam on the right hand edge. DO NOT REMOVE THE SEWN SQUARES FROM THE MACHINE. Then take the next two squares from Row1 and Row2. Place them right sides together and feed them into the machine following your first two squares.
 Continue this process until you have reached the end of Row1 & Row2. Remove the chain from the machine but DO NOT CUT ANY CONNECTING THREADS between the pairs of squares.Sew rows 1&2 together in a chain
 Add Row 3 to the chain
 Sew your vertical strips together

