Friday, July 5, 2013

WIP: Kid Painted Quilt - Blotter Art

We are in the midst of our summer holidays and I'm trying to find activities which involve my kids and that I find interesting - namely creating things! I had this idea to create a series of fabric paintings with my eldest which I would then sew together to make her a quilt that she had co-created.

I have recently invested in a couple of gallons of BioColor and the BioColor Fabric Medium. BioColor does some really cool stuff. But most of all I like it because it is non toxic and the colors are extremely vibrant. It does not however wash out of clothes - in fact it stains badly - so I was quite confident - mixed with the additional fabric medium - it would be a great thing to use for this project. 

She chose her colors - pink and purple. Why does that surprise me? I mixed the following 5 hues. I also added some 'Make it Shimmer' to the dark pink and purple colors.


We are all prepared. Squares (12"x12") of white muslin (I really like the weight and quality of this muslin) on top of waxed paper. The paint is in what Discount School Supply call 'Nancy Bottles'. My girls LOVE squeezing the paint out of them - but gosh can they make a mess with them!


We start to squeeze - our first square is very neat. 


We fold the fabric over and squish. 


Open it up - our first square completed! 


Then we start getting crazy and spreading paint everywhere .... 


... which leads to this.


Squiggles?


Splatty dots? 


There was WAY too much paint being thrown around and the fabric couldn't absorb nearly anywhere enough of the paint. So we changed our strategy. I made an outline to try and contain the spread of paint and once we had folded and splatted we put another square on top of the 'painting' and made a copy.


This worked really really well and gave us two matching copies of each square she made. I also felt having multiples of each 'painting' would be good for making a quilt design.


After reading the instructions (after the painting was over!) I read that the paint had to be left to dry for 5 days - which for an impatient four year old was a daunting wait. I will launder, dry and iron all the squares before putting the quilt together. Bunny #1 is already very proud of her 'blanket. She has also demanded a matching 'fancy pillow' with ruffles .......

Update: You can see how this quilt turned out here http://rachaelrabbit.blogspot.com/2013/07/kid-painted-quilt.html 

Our other kid painted fabric projects this summer have included:
Kid painted Quilt #3 - Spraying Paint
Kid painted Quilt #4 - Shaving Foam Paint

Monday, July 1, 2013

Kid Painted Fabric


My eldest bunny told me that our recycled teepee was 'too boring'. It was 'too white'. So I suggested we should make another one and that she should paint the fabric with her sister.

I prepared 7 colors for painting our fabric. I used BioColor paint and added their fabric medium. I like BioColor because it is kid friendly and the colors are very vibrant. As I have mentioned before the only things that are kind of a drag about this product is that it stains clothes and you are supposed to leave the paint and fabric medium to dry for five days (patience is not a 4 year olds strong point!) I am also making a Kids Painted Quilt from the same fabric & paint.


I mixed the paints in old jam jars. I took outside a plastic bag to collect any messy painted trash, paper towels (for emergency mopping), disposable plates and I also prepared a bucket of soapy water.

Outside I lay some utility tables on the ground (covered in large black plastic bags) to create a hard flat surface and lay my fabric over the top. I used 2 1/3 yards (approx 10ft) of plain white 90" muslin - this is a nice weight of muslin - very white, close weave and not too sheer.)


I poured the paint into the disposable plates ...


... I put disposable diapers on both girls (they are both potty trained) so their big girl pants would not get ruined & stained and the neighbors would not be offended by total nakedness - as well as thinking I was a little bit cuckoo ... 


... let the decorating begin ...


... the girls only used their hands and feet ...


 ... there was a point where the cloth (in my opinion) looked so pretty - but the girls didn't want to stop so I felt like I had to let them continue until all the paint was used up ...


... they enjoyed flicking the plates, carrying them around, pouring paint straight from the jam jars.


Here is our finished piece of fabric. I left it outside for a couple of hours to dry a little and then I took it down to our basement where it will sit for 5 days while my four year old will ask every minute 'is it ready yet?'


Stay tuned for what will be a unique looking teepee!

Our other kid painted fabric projects this summer have included:
Kid painted Quilt #3 - Spraying Paint
Kid painted Quilt #4 - Shaving Foam Paint

***********

Please do not forget about the charity I Spy quilt - we are still looking for scrap fabric donations. 

Tuesday, June 25, 2013

Four Easy Kid Friendly Recipes & Other Ideas

 
We are in the midst of summer holidays - so a lot of my thinking is about how to entertain the bunnies. One of the things we like to do a lot of in this house is simple baking. If it can’t be made quickly and easily I try to stay away from it. It allows me to be relatively successful in the kitchen and juggle the seemingly endless demands from the three bunnies! Recently my eldest (four is very grown up you know) has decided she wants to bake alone – with no help what so ever. So I wanted to share these recipes we use which seem pretty fool proof. It doesn’t seem to matter how they get mixed – they seem to turn out yummy. 

Don't want the kids to cook with you? Give them a range of random ingredients (1 tablespoon each) and let them mix to their hearts content alongside you.

When I can I like to amend recipes to add some whole wheat flour into the mix. If the kids have to eat cake and cookies – let there be some whole wheat flour in there! Because whole wheat flour is much more absorbent than plain flour - we have been able to add much more zucchini to our zucchini bread and more bananas to our banana bread. 

 Ready to start!

I measure out all the ingredients before my bunny starts. Then she gets to add and mix in what ever order she desires. I always do a bit of final mixing – but I do allow her to portion out the cookie dough & scoop batter into tins etc. That is why you will not find any directions to how to mix the ingredients below. 

A cheap toy mixer will give you hours of fun & allow your kids to make their own 'recipes'.

Zucchini Bread
Tip: this recipe freezes really well. I cut the loaves in half and freeze each portion defrosting as we need them.
Makes: 2 loaves 8” x 5”
Oven temp:  350F
Time: 55-60mins
Ingredients
1 ½ cups all-purpose flour
1 ½ cups of whole wheat flour
½ teaspoon salt
1 teaspoon baking soda
1 teaspoon baking powder
3 teaspoons ground cinnamon
3 eggs
1 cup vegetable oil
2  cups white sugar
1 tablespoon vanilla extract
4 cups grated zucchini (about 2 large zucchini)
1 cup chopped walnuts

Cut slabs of sponge cake into different shapes (like building blocks) and let your little ones construct things out them. Here is a car my eldest built & decorated for Father's Day. (I did help her a little - but she made it very clear who was in charge!)

Banana Bread
Tip: when our banana’s go a bit brown and the kids don’t want to eat them we put them in the freezer until we have enough to make banana bread. This recipe also freezes really well. I cut the loaves in half and freeze each portion - defrosting as we want them.
Makes: 2 loaves
Oven temp: 350F
Time: 55-60mins
Ingredients:
8 mashed bananas – we use defrosted frozen ones.
½ cup melted butter
2 cups sugar
1 ½ cups all-purpose flour
1 ½ cups of whole wheat flour
½ teaspoon salt
2 teaspoons baking soda
2 eggs
1 tablespoon vanilla extract
1 cup chocolate chips

My girls & their friends baking Chocolate Layer Cake together.

Chocolate Cupcakes or Cake or Slab
Tip: once you eat this you might never use another cupcake recipe again.
Original Recipe: This is the original recipe from Martha Stewarts Baking Handbook Pg 168 ‘ One-Bowl Chocolate Cupcakes’
Makes: 24+ cupcakes or 2 x 8" layer cakes or 1 x 13"x9" slab
Oven temp: 350F
Time: 20-25 mins for cupcakes 45 mins for layer cake/slab.
Ingredients:
2 ½ cups all-purpose flour
1 ¼ cups cocoa powder
2 ½ cups of sugar
2 ½ teaspoons baking soda
1 ¼ teaspoons baking powder
1 ¼ teaspoons salt
2 large whole eggs, plus 1 large yolk
1 ¼ cups of milk
½ cup + 2 tablespoons vegetable oil
1 tablespoon vanilla extract
1 ¼ warm water

Purple icing and endless sprinkles make everything delicious!

Chocolate Chip Cookies
Original Recipe: Page 149 of Annabel Karmel’s First Meals  ‘ White Chocolate & Cranberry Cookies’ – my eldest just likes chocolate chips in her cookies.
Makes: 30 ish cookies
Oven temp: 375F
Time: 10-12 mins - these cookies are good on the softer and on the crispier side so don't worry if your little one scoops out uneven portions. 
Ingredients:
½ cup softened unsalted butter
½ cup sugar
½ light brown sugar
1 egg
1 tablespoon vanilla extract
½ cup + 1/3 cup of all-purpose flour
½ cup whole wheat flour
½ teaspoon of baking powder
½ teaspoon of salt
1 cup of chocolate chips

 
Don't like cooking? Buy a pre-made cake and let your little ones ice it. Here is a cake (store brought) the girls iced themselves for Daddy's Birthday. Yes - the icing is as thick as it looked. Daddy was a good sport and ate a whole slice!! 

If your little ones prefer making mud pies outside than making a mess in your kitchen check out this great post by Happy Hooligans - Mud Kitchen Activity

Tuesday, June 18, 2013

Quilting Tip: Basting/Layering Quilt

There are so many ways to make quilts. In my humble opinion - as long as you are having fun there is no wrong or right way. Some people are into sewing fabric any way together - other people like to make sure their seams all match precisely – enjoying what you are making is most important. I do however enjoy reading about different ways people do things – make things work - looking for tips to help me – finding people who work in similar ways that I work and that is why I wanted to share the way I put my quilt layers together. I don’t know if it is wrong or right – but I am hoping this little tip can help someone with what I have found to be sometimes a cumbersome experience.

I used to use pins to layer my quilts. I spent hours (literally - perhaps days) ironing, smoothing, pinning, smoothing, repining. It took forever. I recently chatted with Svetlana from s.o.t.a.k handmade and after speaking with her I decided to try out the - often loved by many and perhaps somewhat scorned by some - 505 spray.


It has somewhat changed my life!

The biggest factor is the amount of time saved – which for me with the three little ones is key. Of course the spray is not super cheap – but I don’t use a lot - a very light spritz – so one can lasts for 3 or more full sized quilts. Here is what I do (this is a queen sized quilt.)

I lay the batting out on the floor and smooth it out as much as possible. I use the cardboard fabric tube to roll up my quilt top. 


I spray the first 10” or so of the batting and lay the top 10” of the quilt top on the batting - close to the top & left edge so any remnants from the right & bottom sides of the batting will be big enough to be sewn together again and reused.


I smooth out the top of the quilt as it comes off the roll. If it wrinkles – it easily lifts up and repositions.

I spray and roll in 10” increments smoothing and rubbing all the way.


Keeping the batting flat and smooth underneath I use the cardboard tube to help keep the length of the quilt top flat, taught and smooth on top. Here you can see the beginning of my Recycled Sweater Union Jack peaking out.


Once I have positioned the top layer I trim around the edge of the quilt and batting.


I like to trim the batting off now so I can accurately/neatly/precisely place the quilt top onto the backing fabric - minimizing waste of the backing fabric - the larger I can make the remnants - the more uses I can find for them.

Once trimmed I roll the top with the batting back up on the cardboard tube ...


... and lay out the backing - smoothing it out as much as possible.


I repeat the same process again but with the batting AND the top on the roll.

Once all the layers are together I keep the quilt laid out flat on the spare bed until I'm ready to quilt them. I hope this tip helps you put your larger quilts together in an easier way.  

***********

Please do not forget about the charity I Spy quilt - we are still looking for scrap fabric donations. 

Monday, June 10, 2013

Recycled Teepee Play

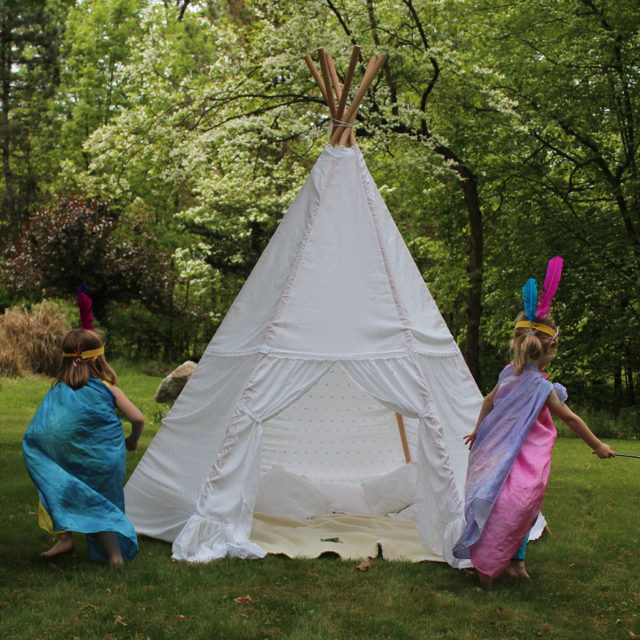
I took our recycled teepee to the country along with our playsilks. Let the play begin!


Giggling away inside. 


Dancing around the teepee. 


Inspecting the local wildlife. 


I made the headbands by pushing some colored feathers through a band of felt. The felt was secured together by a ribbon tie. 


After the initial excitement the girls decided to decorate the teepee with flowers - inserting them into the cotton eyelet holes.


I hope you had a sunny time outside this weekend too.