Wednesday, April 10, 2013

Princess Tea Party Ideas


We had a really fun day for our baby bunny #1's 4th birthday party. The theme was a Princess Tea Party. Here are some little crafty bits we did to make the day special.


I decorated our chandelier with my tulle pom poms.


I found 100 yards of ribbon for $3.99 at The Tulle Shop. I made holes in paper plates with a hole punch and tied a big bow onto the side. 


For party favors we spent a long time painting boxes. Once they were dry we glued on gems and dipped the tops in glitter to soak up any extra glue. We filled the boxes with princess jewels and wrapped the boxes in Princess ribbon that I had found in the $1 bin at Michaels. Our labels were made from this paper punch - it is a really great paper punch for labels - not too small.


I found pink satin chair covers for $2 each. The girls were SO excited by sitting on their Princess chairs - I can see us using these covers for years to come. Not only did they look gorgeous but they washed and tumble dried really well too. The ribbon for the bows was that cheap indoor nylon ribbon you can find in huge rolls at craft stores.


Our gift bags were plain white paper bags that we glued foam crowns onto - we dotted the crowns with yet more plastic gems. 


I made center pieces for the table out of tissue paper flowers. The tissue layers of the flowers are tied together with pipe cleaners and then the pipe cleaners twirled around ribbon wands. I put ribbon around some cheap glass drink dispensers I found at Target some years back. Our birthday bunny had requested pink lemonade. My favorite lemonade recipe is delicious - though I tend to add a ton of ice to help water it down and make it less sweet. To make the lemonade pink I add pureed (and sieved) strawberries (a 16oz box) - sliced lemons and strawberries make it look all the more delicious.


The end result was really pretty. The girls - all dressed in princess clothes - danced (a lot), sang songs and went on the treasure hunt. Our tea party menu was PB&J sandwiches, fruit salad and mini cookies - topped off by an ice cream cake!

Wednesday, April 3, 2013

Valentine Quilt


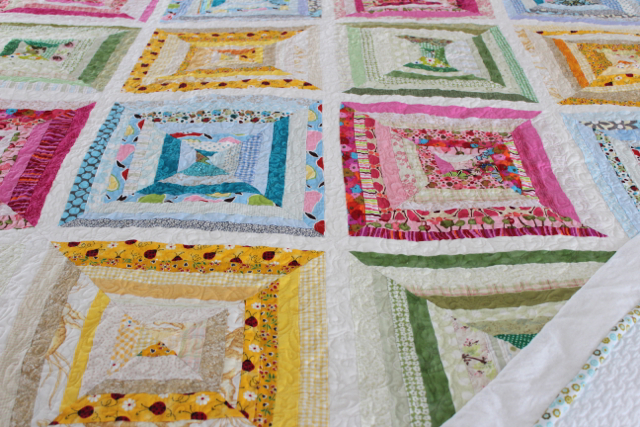
It has taken a while but I have finally finished my Valentine Quilt which is a design from a this book by Elizabeth Hartman. I really like the book - I must go back and visit its patterns and ideas again.


I'm very pleased with the quilt. The top of the quilt has been sewn together for quite sometime (pre bunny #3) but I just hadn't got around to putting all the layers together and quilting the beast.


This quilt it pretty much all made up by fabric scraps from my scrap bin - which is now mysteriously full again - how does that happen?


I used a swirly whirly pattern during the free motion quilting. The same sort of pattern I used on the Mother's Day Cushions.


I even used up the last few strips of scrap fabric left over on the back of the quilt.


You also might remember I used some of the same left over scraps to make this quilt for baby Flora. 


Getting projects finished feels good - with the three little ones constantly underfoot and demanding my attention - finishing these kind of projects feels like a monumental achievement!

Wednesday, March 27, 2013

Tutu Tutorial (Part 5): Basic Sewn Tutu

This is by far my favored method of making tutu's. The resulting tutu is clean, neat, crisp, fluffy and provides a blank canvas for such a wide variety of options and decorations.


You will need:
- 10 yards of 54” tulle - you can use a different width of tulle too - it will just result in a shorter tutu.
- cotton for sewing – the same color as your tulle.
- elastic (I used 1” non roll elastic – but any sort would work)
- a long blunt instrument for threading your elastic – I used a large crochet hook

1)  Prepare your tulle
Fold your tulle together once and then again so you have four layers of tulle. Pin the folded edges. You will sew along the edge that has the two folds. The other edge will have two edges and one fold. Because of the yardage of tulle folding the fabric can be a bit fiddly. I hang the tulle over the banister while I fold and pin.


It is important that your tulle layers lie flatly on top of each other and the folds are tight.


2) Sew your tulle layers together.
Sew a little over 1” down from the folds. Sew one straight line securing all four layers together down the entire 10 yards of tulle. I used a walking foot which helped prevent the tulle layers from slipping

OPTIONAL: Adorn your tulle.
Now is a the time to sew on ribbon, stick on gems or stuff your tulle with pom poms/petals etc Do these kinds of decorations BEFORE you insert the elastic. Once the elastic is inserted the tutu becomes so full it becomes tricky to work with.   

(I stuck gems to the tulle with a glue gun - practice first - those glue guns can make a mess!)

(I sewed ribbon to the entire length of one layer of tulle before inserting the elastic)
 
3)  Insert your elastic
Cut your elastic to your desired waist size (this chart might help you.) A blunt, easy to handle instrument is easiest to help you thread your elastic into the waist band. I impaled (literally) my elastic on a large crochet hook – and used that to thread the elastic through the gap on your waist band.


There is a lot of tulle here. Take your time threading the elastic in – you do not want to rip the tulle or loose the elastic half way through.


Sew the elastic firmly together. When I sew elastic together I like to sew the two ends together with a straight stitch first (forward & back once).


And then fold the seam over one way and secure again with a zigzag stitch (forward and back once).


I used the same color thread as the elastic (I used black thread on white elastic here for demonstration purposes only.)

5) Sew the back seam
Ensure all your tulle layers are flat when you sew the back seam together.


Once you have sewn all the layers together - trim neatly


OPTIONAL: Decorate your finished tutu


Add a bow to your waist band, sew on flowers or butterflies ...


... the final touches are endless.

UPDATE: I love seeing anything that my blog inspired you to make. Here is a tutu that Michele at MicMac' Bows made using this tutorial. This tutu was made for a 12mth old. So we adjusted the measurements.
For a shorter tutu for younger girls. 
- Purchase 5 yards of 54" tulle.
- Cut the 5 yards to 2 strips of 27" x 5 yards.
- Sewed the two lengths together into 1 strip of 27" x 10 yards.
- Then follow the tutorial to make a tutu that is approx 6.75" long & super cute.


Previous Tutu Tutorials: 

Wednesday, March 20, 2013

Easter Tree

The ornaments from our Valentines Tree have been taken down and carefully stored for next year and my eldest has been busy at work decorating our now permissed Easter Tree!! You can read about how our tree came to life here. (But just to quickly recap this is a branch we found in our garden and the girls lovingly decorated it with glue and glitter. Our aim is to keep the tree up all year around and have the girls make crafts and decorations for it with a seasonal or holiday theme.) 


We made some cute hanging flower ornaments out of cupcake cases. 


I had found these sweet bright birds in Michaels. 


Paper eggs got covered with fluffy pom poms. 
 

We tied our colorful feathers to the end of the branches with bright green ribbon. 


What the kids see as they walk around and underneath it looks is pretty cool. 


We are all getting so much enjoyment from this branch we found in the garden. I can't wait to see how the tree develops and morphs over the coming year. 

Wednesday, March 13, 2013

Mother's Day: Hand Print Pillows

Mother's Day in the UK is on a different day than Mother's Day in the US. (This year Mother's Day in the UK was March 10th.) One would think that this would give me two days of pampering by my family - unfortunately - this is not the case! However we did need to send Granny a little gift to help her celebrate the day across the pond.

We decided to make her some pillows with hand and foot prints.

First we need to protect the floor so we stuck down some foil under a sheet of fabric. We did our feet and hand prints in a bathroom that hasn't been decorated in 45 years (literally!) so I wasn't too nervous about little hands and feet covered in paint.


First I had the girls sit on the floor and I painted their foot with a thick layer of fabric paint.


 I then helped them stand on the fabric to make our prints.


Once our prints were dry we added stems and leaves by potato printing. (In case you are wondering about the presence of Olivia the Pig - she is the class 'pet' and she was staying with us for the weekend.)
 

 We added a flower pot and a ribbon bow.


I quilted with some swirly whirly free hand quilting ...


... and added some fancy flange to the pillows.


Here are our finished cushions.


I opted for a  pillowcase opening sealed with a bright purple ribbon. Here is the back of the cushion.


Such a cute gift that I think any Granny would be thrilled to receive. Even our littlest (6 months) got his feet and hands in on the action - his first official art work!!

Wednesday, March 6, 2013

Tutu Tutorial (Part 4): Using Fabric Scraps - Tutu Ideas

This is less of a 'tutorial' and more of an ideas page of how you can use fabric scraps to make tutu's.

Recycled Shirt Tutu
Using the No Sew Crochet Elastic Tutu method I made this tutu. I had some strips of cotton left over from this fun project in 2008 (yes I keep scraps from that long ago!) - so I decided to make them into a little fabric tutu. I don't know it it reminds me of a little kilt or one of those raggy morris men outfits!


(Men's cotton shirts yield a lot of fabric that can be recycled into all sorts of things - you might remember I recycled lots of shirts into a quilt. We still have it - in fact is it now in our little boys room.)

Silk Tie Tutu
Using the No Sew Crochet Elastic Tutu method I made this tutu. The 1st layer is white tulle and the 2nd layer is re purposed white ties. Because of the size of knot that the ties make the ties are knotted on every other space in the crochet elastic. I used a binding stitch on the end of the tie pieces to try and minimize future fraying.


Previous Tutu Tutorials: No Sew Tulle Tutu
                                        No Sew Tutu with Crochet Elastic Ribbon
                                        Recycled Plastic Bag Tutu

Stay tuned for my next post: