Showing posts with label scraps. Show all posts

Wednesday, September 24, 2014

Scrap Buster: Splatastic Scraps


One of the things I wanted Luke to help me with was how to make the materials I use (old clothes) become more interesting - for my designs and quilts to be more innovative - and perhaps on occasion less traditional. I started unloading my huge stash of clothes waiting to be recreated into something wonderful - when Luke asked if I kept scraps - me? keep scraps? - you could almost see him gag when I showed him how much of my scraps I kept! His theory was why use the good stuff when we could use the scraps.

Wednesday, April 3, 2013

Valentine Quilt


It has taken a while but I have finally finished my Valentine Quilt which is a design from a this book by Elizabeth Hartman. I really like the book - I must go back and visit its patterns and ideas again.


I'm very pleased with the quilt. The top of the quilt has been sewn together for quite sometime (pre bunny #3) but I just hadn't got around to putting all the layers together and quilting the beast.


This quilt it pretty much all made up by fabric scraps from my scrap bin - which is now mysteriously full again - how does that happen?


I used a swirly whirly pattern during the free motion quilting. The same sort of pattern I used on the Mother's Day Cushions.


I even used up the last few strips of scrap fabric left over on the back of the quilt.


You also might remember I used some of the same left over scraps to make this quilt for baby Flora. 


Getting projects finished feels good - with the three little ones constantly underfoot and demanding my attention - finishing these kind of projects feels like a monumental achievement!

Wednesday, March 6, 2013

Tutu Tutorial (Part 4): Using Fabric Scraps - Tutu Ideas

This is less of a 'tutorial' and more of an ideas page of how you can use fabric scraps to make tutu's.

Recycled Shirt Tutu
Using the No Sew Crochet Elastic Tutu method I made this tutu. I had some strips of cotton left over from this fun project in 2008 (yes I keep scraps from that long ago!) - so I decided to make them into a little fabric tutu. I don't know it it reminds me of a little kilt or one of those raggy morris men outfits!


(Men's cotton shirts yield a lot of fabric that can be recycled into all sorts of things - you might remember I recycled lots of shirts into a quilt. We still have it - in fact is it now in our little boys room.)

Silk Tie Tutu
Using the No Sew Crochet Elastic Tutu method I made this tutu. The 1st layer is white tulle and the 2nd layer is re purposed white ties. Because of the size of knot that the ties make the ties are knotted on every other space in the crochet elastic. I used a binding stitch on the end of the tie pieces to try and minimize future fraying.


Previous Tutu Tutorials: No Sew Tulle Tutu
                                        No Sew Tutu with Crochet Elastic Ribbon
                                        Recycled Plastic Bag Tutu

Stay tuned for my next post:

Tuesday, January 29, 2013

Tutu Tutorial (Part 2): No Sew Tutu using Crochet Elastic Ribbon

Again for this type of tutu I have used the same knotting method as you would make a No Sew Tulle Tutu - but instead of using any type of elastic or ribbon as a waist band you use crocheted elastic.


You will need:
- some crochet elastic ribbon or a pre-made crochet headband
- strips of tulle or some other fabric
- ribbon or other optional decorations

1) Cut and secure your waist band. 
I used 2 1/4 inch crocheted elastic cut from a spool for this project - but you can buy pre-made crochet headbands at most drug stores. This stuff is VERY stretchy - you need to make your waist band much smaller than you think e.g. I made my waist band about 6" smaller than I needed.


I roughly tied the elastic together with a scrap piece of tulle before I started knotting. Once the tutu was finished I braided the join with satin ribbon and tied a bow. 

2) Cut your strips of Tulle
I chose to buy bolts of tulle and I cut them into 6 inch strips with my rotary cutter. This was much cheaper than using tulle ribbon on spools  and it was very quick to cut it this way.


You need to cut your strips twice as long as you want your tutu to be. I cut 26" strips for this tutu. Each round took approx 40+ strips. I knotted 2 rounds of tulle strips - so estimate you will need approx 55-60 yards of 6" tulle for this project. The finished tutu is extremely full. I have seen some tutu's made this way just using one round of knots - so this could be an option for you too.

3) Tie your knots into the elastic


Wrap the elastic band around something big (I used a sofa cushion) and start knotting. I started to tie my knots into the second row of the crocheted elastic. Use one strip of tulle for each knot.


Continue tying knots until you have completed the first round. Start tying knots for your 2nd round - each knot will sit between the knots on the row below. I think 2 rounds of knotted tulle yields better results that just one round - you could do more rounds - but the fluffiness does get a little out of control!


4) Fuss, Fiddle & Enjoy
The more you separate the strips and tulle and fuss with the tulle - the fluffier your tutu will be.


Previous Tutu Tutorial: No Sew Tulle Tutu

Stay tuned for my next posts:
- Recycled Plastic Bag Tutu
- Tutu using Fabric scraps
- Basic Sewn Tutu

Thursday, April 26, 2012

Scrappy Sleep Sack

In a moment of distraction from my current 'to do' list - I made this scrappy Sleep Sack for a little baby girl. It was a really easy project. I used left over strips of pink fabrics, remnants of quilt batting for the padding and some white cotton flannel that has been lying around begging to be used for years. I think the only thing I had to buy was the zip. I feel this would be a good project to make from recycled cotton shirts as well.
 
(The sleep sack is really quite cute and I feel frustrated that the photos don't do it justice - every wrinkle is highlighted - in real life it doesn't look at all wrinkled - it looks soft and cosy. Does anyone have any photography tips for taking pictures of fabric?)

I added little scrappy details - patches embellished with embroidery thread. 
I have often found zips are hard to put in - but this one went remarkably well. The binding is a cosy purple flannel. I always hand finish my bindings.

I've also been waiting for the delivery of some net curtain wire to hang curtains for the playhouse outside (thank you Sue for your suggestion!) I wasn't able to find any net curtain wire in the US - so I got it from an e-bay shop in the UK. The curtains are made from 2 yards of cotton I got years ago but never used - I don't think I ever liked the pattern but I think it works well for the little house.
Slowly but surely I'm working through my stash of fabrics!

Monday, April 16, 2012

Baby Girl Playmat

Another project finished and my first photos outside this year! I had forgotten how bumpy grass can be for photos! A little quilted play mat for a baby girl. I added some tags in the top corner to hook those little baby toys to. This quilt is made from the scraps left over from my scrappy Valentine Quilt (yet to be quilted - that is still on the list of to-do's.) I haven't done any free motion quilting for a while - but I didn't feel too intimidated tackling this piece.I hope it will be enjoyed by the little lady who is due to arrive soon.

Wednesday, February 29, 2012

Motivation

I'm lacking in motivation. I think because the only real time I get to myself is nap time. Once both girls are quiet and resting it leaves me with a small window of time which I 'have' to use for crafting else I go a little crazy with a feeling of not having achieved anything for myself. I'm beginning to resent that pressure to sit down and be creative at that very moment - sometimes I'm just not in the mood and sometimes I'm just bit mentally exhausted from having battled with two gorgeous - but sometimes unreasonable - bunny's all morning and I just want an hour of mindless anything ... so I've be rebelling by filling nap times with other delightful activities such as laundry, cleaning, emptying and refilling the dishwasher ...

This is not a productive mindset ... I have projects I want to make/do/achieve falling out my ears.

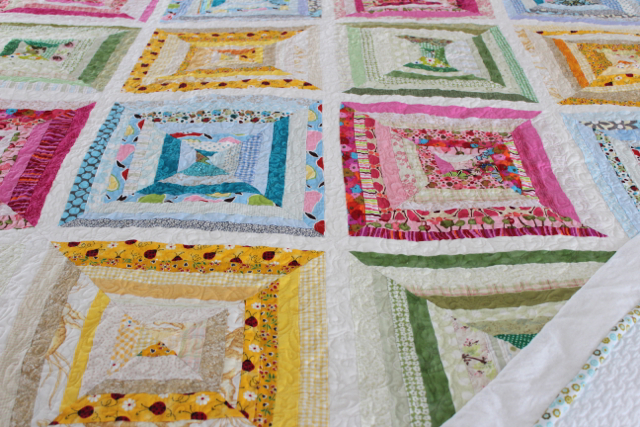
But I have been doing some sewing. I've finished the top of my Valentine Quilt. I'm not convinced by the quilts size - so I sewed all the scrappy strips left over together in hopes to make a border for the quilt ... ... it all looked a little odd when I laid everything together so I made one of these long strips into this little baby mat/quilt (still to be quilted.) It has cute scrappy corners.
My other idea is to turn the Valentine Quilt into a picnic blanket by using some laminated cotton or a poly-laminate on the back ... I like this idea ... and I think it would be something we might use a lot.

Every evening I try and tackle a little bit of my paper pieced quilt. It is coming along - I don't want to paper piece the entire quilt - but use hand quilting to emboss unpatched areas of the quilt and maybe have scattered paper pieced blocks throughout the quilt top too ... ... I haven't quite decided on exactly how it is all going to come together ... but I have a vague vision at least ... somewhere over the top of that never ending laundry basket!!

I'm also making some more art smocks - birthday presents for little people. I beginning to like mixing up bright colors for these smocks - the color splashes seem adapt for little budding artists. I'm often much to shy with color - something I'm really trying to get better with.

Wednesday, February 8, 2012

WIP: Quilt update

I've been making progress on my scrappy Valentine Quilt (Elizabeth Hartman.) I'm really pleased how it is looking. Here it is all laid out - ready to be sewn together. You make the blocks by sewing strips onto a piece of square paper - trim the block - remove the backing paper and then sew all the blocks together. Elizabeth H. warns you that as the edges of the blocks have been cut on the bias they will be prone to stretching when you sew them together - so I kept the paper backing on while sewing the blocks together. It has been working really well - no stretching - my blocks are still squares.

I found this wonderful pillow from Little Blue House on a Hill - which seems like a great idea for a smaller project using this technique/pattern.
This is a peek at the first half that has been sewn all together. I used up so many scraps - greatly pleased with finally using some up. But I'm just terrified of the prospect of quilting the beast ... I will let you know when it is finished.