

What you will need
- 1 hula hoop (mine is 65") - purchased from the Dollar Tree $1
- 3 packets of Ikea Lill curtains - $12
- Ribbon (not too thin) - two lengths of around 54" - mine are from my recycled ribbon bucket - but lets assume you can find something at the dollar store or JoAnn's bargain bucket $1
- 1 yard of fabric - $6
TOTAL = $20
(In this price I am assuming you have a small amount of some sort of glue in the house at hand.)
Variations on a theme ....
Any curtain panels with a rod pocket can be used for this project. I really wanted to use some pink & purple sparkly sheer panels I had spied on JCPenny.com. But the budget won out. I think there could be a million ways you could take this tent with different fabrics and different panels. We also used one of our play silks we had dyed with red cabbage and baking soda as the canopy fabric. It was the perfect icy color our tent needed.

1) Fold your two ribbon lengths in half and make a knotted loop in the middle. (I knotted my lengths at 5" from the middle which yeilded an approx 3" loop.) Knot both lengths and put them aside. NOTE: I used two 54" lengths but if your hula hoop is wider you will probably want to use a longer length.

2) Open your hula hoop at the join and thread on all your curtains - secure the hula hoop back together again once you have the panels on the hoop.

3) Tie the lengths on ribbon onto the hula hoop. Make sure all the lengths of ribbon are equal in length. You can tie between panels or thread the ribbon through the curtains. Totally up to you - I did both.


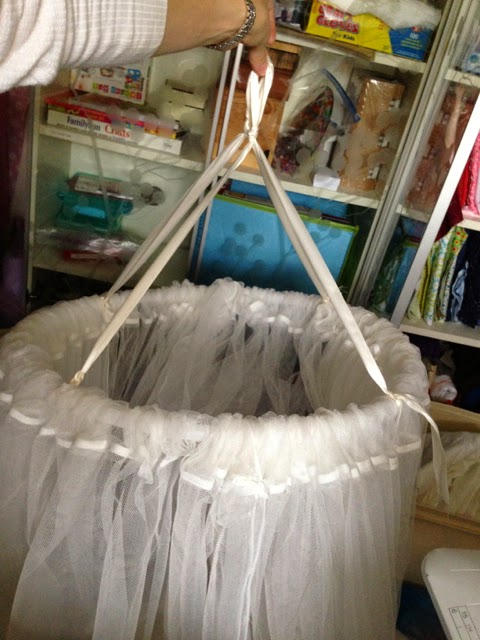
4) Turn your yard of fabric into a square (36"x36") and make a small hole in the center. Thread the knotted ends of ribbon through the center of the fabric. NOTE if your hoola hoop is bigger than mine you might need to use a bigger piece of fabric.

5) Use dots of glue (glue dots, fabric, glue gun, super glue etc) to secure the canopy to the top of the curtains/hula hoop - creating any folds/draping etc as you go if you wish.
6) Ways to embellish your tent:
- Glue lengths of ribbon to the outside of the curtains. I used 4 packets of 50 cent ribbon from JoAnn's - ($2) & some blue recycled ribbon from my stash.

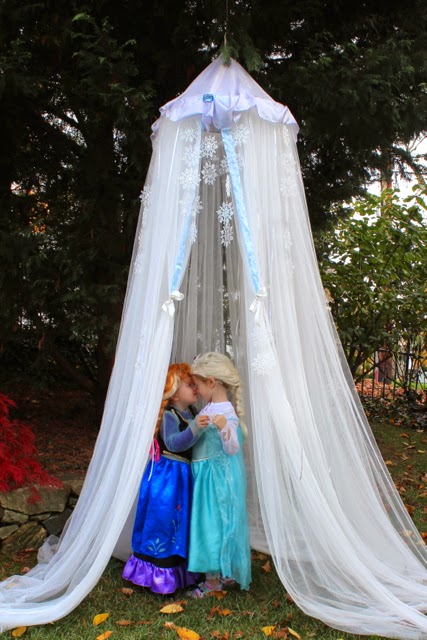
- Add flowers, butterflies, snowflakes etc to 'theme' your tent. I used 4 packets of plastic snowflakes from the Dollar Tree ($4) to make a 'Frozen tent'.

- Fairy or other novelty lights - I used some from our Christmas tree box.

We had a full on Frozen reenactment. In case you wondered how Anna really found Elsa's castle - she came on a pink scooter ....

Let it go, let it go .....

Snow is falling everywhere ....

Stay away Anna .....

Sisterly love can conquer anything ..... after all we all like warm hugs!
And when the daylight fades - the warm hugs continue.

2 comments:
I think that is the cutest thing I have seen in a *very* long time. I turned a gazebo into a fairy pavilion for a summer birthday party, with yards of tulle and fairy lights and beads - such a satisfying project but yours is better because it can be moved around!!!
That is very cute :) I went to ikea yesterday and bought the Alvine spets curtian as well as the lill ones.. I made a canopy for a bed with a dream catcher in the center hoop (I used a 14" embroidery hoop) I plan on making a bigger one that the kids can play in too using a 24" embroidery/quilting hoop.. I love your frozen theme.. it's super cute and your girls looked like they had a lot of fun!
Post a Comment